How to Install Docker on Ubuntu 22.04
5:28 PM Dedy Yasriady
cd ~
sudo apt update
sudo apt install apt-transport-https ca-certificates curl software-properties-common
curl -fsSL https://download.docker.com/linux/ubuntu/gpg | sudo gpg --dearmor -o /usr/share/keyrings/docker-archive-keyring.gpg
echo "deb [arch=$(dpkg --print-architecture) signed-by=/usr/share/keyrings/docker-archive-keyring.gpg] https://download.docker.com/linux/ubuntu $(lsb_release -cs) stable" | sudo tee /etc/apt/sources.list.d/docker.list > /dev/null
sudo apt update
apt-cache policy docker-ce
sudo apt install docker-ce
sudo systemctl status docker
sudo usermod -aG docker ${USER}
su - ${USER}
https://www.digitalocean.com/community/tutorials/how-to-install-and-use-docker-on-ubuntu-22-04
How to Enable snmp Daemon
4:09 PM Dedy Yasriady
$ sudo apt update
$ sudo apt install snmp snmpd snmp-mibs-downloader
$ sudo nano /etc/snmp/snmpd.conf
Then set rocommunity password securely:
rocommunity public1234xA12 default -V systemonly
$ sudo systemctl restart snmpd
Securing SNMP Configuration
Security is a critical aspect when configuring SNMP. Always ensure that community strings are complex and not easily guessable. Additionally, restrict access to your SNMP service to trusted hosts only.
Cikarang, West Java - 20240810/06:11AM.
How to test your Linux Antivirus (eicar)
6:09 PM Dedy Yasriady
Antivirus for Linux (clamav)
5:57 PM Dedy Yasriady
Ansible Ubuntu 24.04 LTS
5:26 PM Dedy Yasriady
Download Raspberry Pi Toolchain - Cross Compiler
2:51 AM Dedy Yasriady
Develop, test, run your application on Linux desktop, and deploy on Rasberry Pi2 board, x86_64 and other Linux machine.....
Cross compiler application development for Raspberry Pi is now available for Linux. This ide/toolchain known to work and already tested on Ubuntu 14.04-LTS Trusty Tahr.
wget https://raw.githubusercontent.com/dveltool/toolchain/master/installer/dveltool_installer.sh
chmod 755 dveltool_installer.sh
./dveltool_installer.sh
For installation packages, please check on following url:
https://github.com/dveltool/toolchain
Toolchain is generated using awesome build system called buildroot, and make use of prominent eclipse ide.
Please make try this application, and would like to hear your feedback ....
wxRibbon, another sample wxWidgets/GTK2 application running on Raspbian Jessie:
How to Compile Linux Kernel with Current Configuration
7:03 PM Dedy Yasriady
This article is abount recompiling Ubuntu 14.04 kernel using current configuration. Customizing of the kernel is possible after you made copy of current config from /boot/config-`uname -r` to .config as well.
For linux distribution version other than Ubuntu 14.04 TrustyTahr might also applied with several adjustment.
Prepare workspace
$ mkdir -pv /opt/Ubuntu_x64/TrustyTahr/KERNEL
$ cd /opt/Ubuntu_x64/TrustyTahr/KERNEL
$ git clone git://kernel.ubuntu.com/ubuntu/ubuntu-trusty.git
Get Current Kernel
$ export MYKERNEL=linux-image-$(uname -r)
$ apt-get source $MYKERNEL
$ cd cd linux-lts-utopic-3.16.0
$ cp /boot/config-`uname -r` .config
Do customize whatever you want to modify on this kernel source ...
Then,
$ make
$ make modules_install
$ make install
Raspberry Pi GPIO Programming with C++
6:15 PM Dedy Yasriady
- WiringPi
- Direct Register Access by Hertaville
- Tutorial by VisualGDB
- My choice to use c++ library made by McCauley, on Raspberry-Projects.com, and Library homepage.
This article is not finished yet, ... please wait at the moment....
slimbian - Slim and Minimalist Raspbian
12:19 AM Dedy Yasriady
- 100% Official Raspbian compatible.
- Less than 500MB installed.
- Small memory footprint ~56MB.
- ~09 seconds boot up on Raspberry Pi 2.
- Linux 4.1.7-v7+ armv7l.
- SSH server enable.
Cross Compile WxWidgets/C++ Application for Raspberry Pi
1:52 AM Dedy Yasriady
How to Build wxWidgets / C++ for Raspberry Pi Model 2 (ARMv7 Architecture).
wxWidgets is an awesome C++/GUI library to work with. It can produce very nice desktop interface and has complete class library either for GUI on non GUI. Binary program yields by this library is also small and portable. Statically linking is possible to make the program running independently to any linux distribution.
Raspberry Pi is credit card sized computer, it has small form factor with capability similar to PC of PIII/900MHz with 1GB RAM. Thus, sufficient to running desktop application, as in his case, Raspbian Wheezy.
Here, you will find brief tutorial how to build wxWidgets for Raspbian to run on Raspberry Pi model 2 (ARMv7 processor).
Setup environment to used are:
- Build system on Ubuntu 14.04 LTS x64
- buildroot
- wxWidgets-3.0.2
- Target: RaspberryPi2 and Raspbian Wheezy
Build Toolchain for ARMv7
To build cross architecture Toolchain we can use awesome build system called buildroot (http://buildroot.uclibc.org/)$ cd ~
$ mkdir wxWidgets
$ cd ~/wxWidgets
$ git clone git://git.buildroot.net/buildroot
$ cd buildroot
$ make raspberrypi2_defconfig
$ make menuconfig
Adjust some requirement as follow:
Toolchain
C library (uClibc) --->
(X) glibc
Target packages > Graphic libraries and applications
[*] X.org X WIndow System --->
Target packages > Libraries > Graphics
[X] libgtk2
[Save]
$ make
Build wxWidgets for ARMv7
Once above toolchain baked and cooked well, then we can start to build and compile wxWidgets and it’s sample application.$ export PATH=~/wxWidgets/buildroot/output/host/usr/bin:$PATH
$ cd ~/wxWidgets
$ wget http://nchc.dl.sourceforge.net/project/wxwindows/3.0.2/wxWidgets-3.0.2.tar.bz2
$ tar -xzpvf wxWidgets-3.0.2.tar.bz2
$ cd wxWidgets-3.0.2
$ mkdir -p build_rpi2/wx3.0.2u_static
$ cd build_rpi2/wx3.0.2u_static
$ ../../configure --host=arm-linux --with-gtk --with-libpng=builtin --with-libjpeg=builtin --with-libtiff=builtin --with-regex=builtin --with-zlib=builtin --with-expat=builtin LDFLAGS="-static-libgcc -static-libstdc++"
$ make
Sit back and relax......
Build Sample Application
$ cd samples/minimal$ make
Copy sample/minimal/minimal to Pi's sdcard and from there try to run:
$ ./minimal
See the result ................
After adjusting some path as describe on buildroot manual, you can download ready used Raspberrypi-Toolchain on sourceforge.net. The toolchain already tested on Ubuntu 14.04 with wxWidgets-3.0.2 as target built. This toolchain can be used for compiling Plain C/C++ for Pi application.
Linux / Raspberry Pi / Raspbian / Ubuntu / wxWidgets
How to Configure Ubuntu Linux Look Like Windows 7/8
7:53 PM Dedy Yasriady
What You Need?
Here I will explain in brief tutorial how to make such configuration. What you need among some ingridients are:- Ready used Ubuntu Linux
- Cinnamon Desktop
- Windows 7/8 Theme
- Windows Icon
Get Installed Cinnamon Desktop
First, you need to install Cinnamon Desktop in your Linux Box with following command line:Terminal Commands:
$ sudo add-apt-repository ppa:lestcape/cinnamon
$ sudo apt-get update
$ sudo apt-get install cinnamon
Install Windows Theme
Terminal Commands:$ sudo add-apt-repository ppa:noobslab/themes
$ sudo apt-get update
$ sudo apt-get install win-themes
Install Windows Icons
Terminal Commands:
$ sudo add-apt-repository ppa:noobslab/icons
$ sudo apt-get update
$ sudo apt-get install win-icons
Apply The Installation


How To Change Grub Default Boot
4:07 PM Dedy Yasriady
$ sudo cp /etc/default/grub /etc/default/grub.bak
$ sudo nano /etc/default/grub
Change to
After saving above file, then issue this command:
$ sudo update-grub
$ sudo reboot
You can search MenuEntry Label on this file: /boot/grub/grub.cfg
Build wxWidgets Application to Run on Any Linux
4:22 PM Dedy Yasriady
This tutorial inspired by article written by Tierra here, mentioned about linking with gtk and run on any linux. Also to show you how to make static linking to libstdc++ since various linux distribution will have different version of this library that could lead to error program to running.
Note: Remember that GTK is licensed under LGPL, which essentially means that in order to link it to your application _statically_, your application will have to be (L)GPL-licensed.
$ sudo mkdir -p /opt/wxWidgets
$ cd /opt/wxWidgets
$ wget http://ftp.wxwidgets.org/pub/3.0.2/wxWidgets-3.0.2.tar.bz2
$ tar -xapvf wxWidgets-3.0.2.tar.bz2
$ cd wxWidgets-3.0.2
$ mkdir -p build2/wx3.0.2u_static
$ cd build2/wx3.0.2u_static
$ ../../configure --disable-shared --with-gtk --with-libtiff=builtin --with-libjpeg=builtin --with-libpng=builtin --with-regex=builtin --with-zlib=builtin --with-expat=builtin LDFLAGS="-static-libgcc -static-libstdc++"
$ make
Note: using similar switch as shown at autoconf above , you may also build/compile any Plain C/C++ application to link statically.
GUI Designer for wxWidgets using wxFormBuilder
4:07 PM Dedy Yasriady
Installing wxFormBuilder in Ubuntu
$ sudo apt-get install libwxgtk3.0-0 libwxgtk-media3.0-0
$ sudo add-apt-repository -y ppa:wxformbuilder/release
$ sudo apt-get update
$ sudo apt-get install wxformbuilder
Installing wxFormBuilder in Windows
Get download wxFormBuilder_v3.5.1-rc1.exe
Work with the Tools, Begin wxFormBuilder
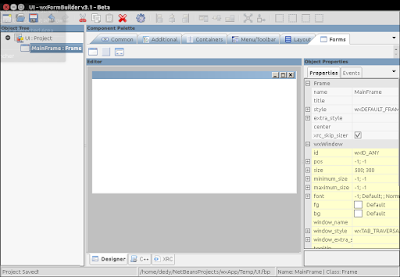
Starting the program and you will be greeted with new blank project with MyProject1 as an intial name.
For easy associating with the UI naming, then I would like to alter this name into UI. Take a look at Object Properties on the right pane, and make change to this properties:
name : UI
file : UI

Then save the project into your netbeans project (let say into folder wxApp) and make the name UI.fbp
Adding Frame
Activate tab [Forms], then select/click Frame to insert it into project and adjust properties:name : MainFrame
title : My wxApp

You basic GUI is now ready and to make a test, just press [F5]

Working with Window Controls

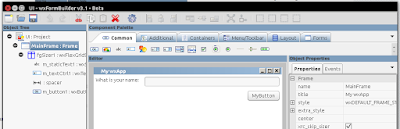
To enrich the GUI and to have full featured application window, you may can follow the step below:
Adding layout:
[Layout] + wxFlexGridSizerAdding Label or StaticText
Properties :
growablecols : 1
[Common] + wxStaticTextAdding TextControl
Properties :
label : What is your name:
[Common] + wxTextCtrlAdding Spacer
Properties :
flag : wxEXPAND [v]
[Layout] + spacerAdding Button
[Common] + wxButtonPreview the Window, press [F5]
Properties :
flag : wxALIGN_RIGHT [v]

Generate C++/wxWidgets codes
After make a GUI design, you may then generate C++ code, just press :[F8] to Generate base class and yield you with 2 files UI.cpp and UI.h. PLEASE DO NOT make any MODIFICATION directly to these files
[F6] to Generate Inherited Class inside the files UIMainFrame.cpp and UIMainFrame.h, on which you will work with directly
Complete File is Here !
Get fresh wxApp from my Github repository, clone to your local folder and try to figure out the files inside this netbeans projects.Happy coding …………………… / Ddy
GUI / RAD / Visual Designer / wxWidgets
Howto Build wxWidgets with MinGW
2:37 AM Dedy Yasriady
Installing Toolchain
Download TDM-GCC from http://tdm-gcc.tdragon.net/downloadAfter completion of installation, please relogin to Windows to make sure path to tdm-gcc applied.
Prepare wxWidgets Source
> Extract wxWidgets-3.0.2.zip into c:\opt\wxWidgets\wxWidgets-3.0.2
> cd \opt\wxWidgets\wxWidgets-3.0.2\build\msw
Build for DEBUG Version
> mingw32-make -f makefile.gcc BUILD=debug UNICODE=1 SHARED=0 CXXFLAGS="-std=gnu++11"
Build for Release Version
> mingw32-make -f makefile.gcc BUILD=release UNICODE=1 SHARED=0 CXXFLAGS="-std=gnu++11"
Final Result is Here
That’s all, the simple steps to build wxWidgets on Windows without Msys. Check the result inside this folder: lib\gcc_lib
GitHub - HowTo Work With
12:07 AM Dedy Yasriady
It would be easy for us to have program source code stored in centralized version control system in the server. GitHub provide such service free for open source projects. The simple steps herewith will guide you to setup and initialize your very first project into GitHub.
Install Git on Ubuntu
$ sudo apt-get install gitConfiguring GitHub
$ git config --global user.name “user_name”$ git config --global user.email “email_id@domain”
Create Local Repository
$ git init MyRepo$ cd MyRepo
Create README.md
README.md is initial file you may put on the repo.$ nano README.md
Adding Repository Files to an Index
For the next, you can populate MyRepo directory with program source codes. copy over all the files into the directory, or create one if you wish to.$ git add *
$ git commit -m “some_message”
Create Repo on GitHub with Same Name
Once the repo is made on the GitHub server, you may then push local content. To connect to GitHub, use following command:
$ git remote add origin https://github.com/yasriady/MyRepo.git
Pushing Files into GitHub
Final step is to push your files into server with following command line:$ git push origin master
Check the result on your GitHub.com
Congratulation,.... you are now on GitHub, Happy Coding....!!
How To Make Linux Fonts Look Like Windows Fonts
12:41 AM Dedy Yasriady
For this purpose, I set font configuration with following simple steps:
$ sudo apt-get install msttcorefonts
$ sudo cp 39-clearfonts.conf /etc/fonts/conf.avail/
$ sudo ln -s /etc/fonts/conf.avail/39-clearfonts.conf /etc/fonts/conf.d
$ sudo apt-get install unity-tweak-tool
$ unity-tweak-tool
How To Configure wxWidgets on Ubuntu
12:40 AM Dedy Yasriady
$ sudo apt-get install build-essential
After starting netbeans, then make selection to: Make [Tools] - [Plugins]


